GuideWordPress not sending email? Send it reliably through your mailbox
Last updated: 26 October 2026
Password resets, order confirmations, contact form messages: WordPress sends them all by email, with no setup. For the best chance of reaching the inbox, send them through one of your MariHost mailboxes with an SMTP plugin. They then come from a real address on your domain, signed with its DKIM, which mail services trust. This guide sets that up with FluentSMTP, a free plugin we use ourselves, and explains what your website may send. It takes about 10 minutes.
What your website can send
- Up to 50 emails an hour. Mail over the limit is refused, and the plugin or form that sent it shows an error.
- Only emails your site sends because someone did something: password resets, order confirmations and invoices, contact form messages, account emails.
- No newsletters, offers or other marketing email, and no bulk mail. Send those with a mailing service: it handles unsubscribes and keeps your domain's good name with mail services. Our Acceptable Use Policy has the details.
When your site sends through a mailbox, as in this guide, the mailbox's limit applies: also 50 emails an hour, shared with the email you send yourself from it.
WordPress email not sending? Start here
- A mailbox on your domain, such as [email protected]. See Create an email account. If your plan has several, a mailbox just for your website, such as [email protected], keeps its email apart from yours.
- DKIM switched on for your domain, so your site's emails are signed: see SPF, DKIM and DMARC.
Get your mailbox's settings
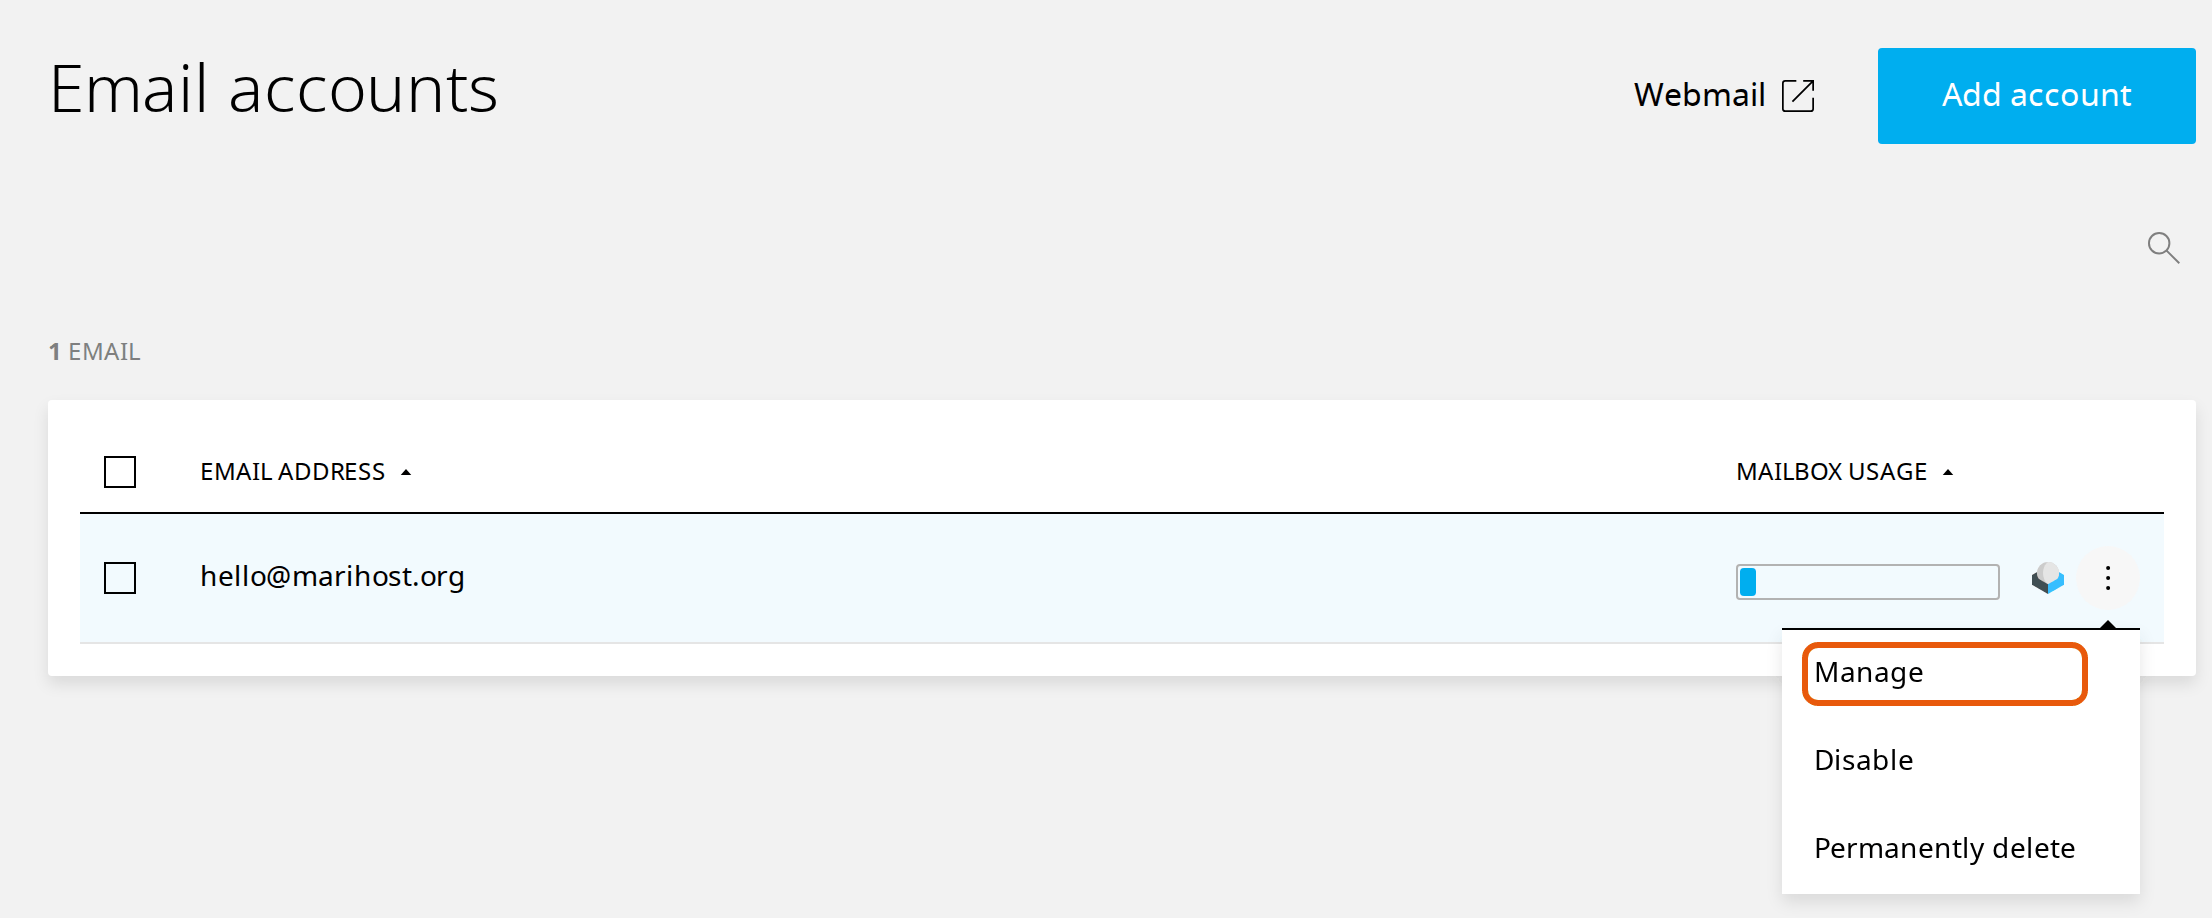
In the control panel, open Emails in the left sidebar, click ⋮ next to the mailbox and choose Manage.
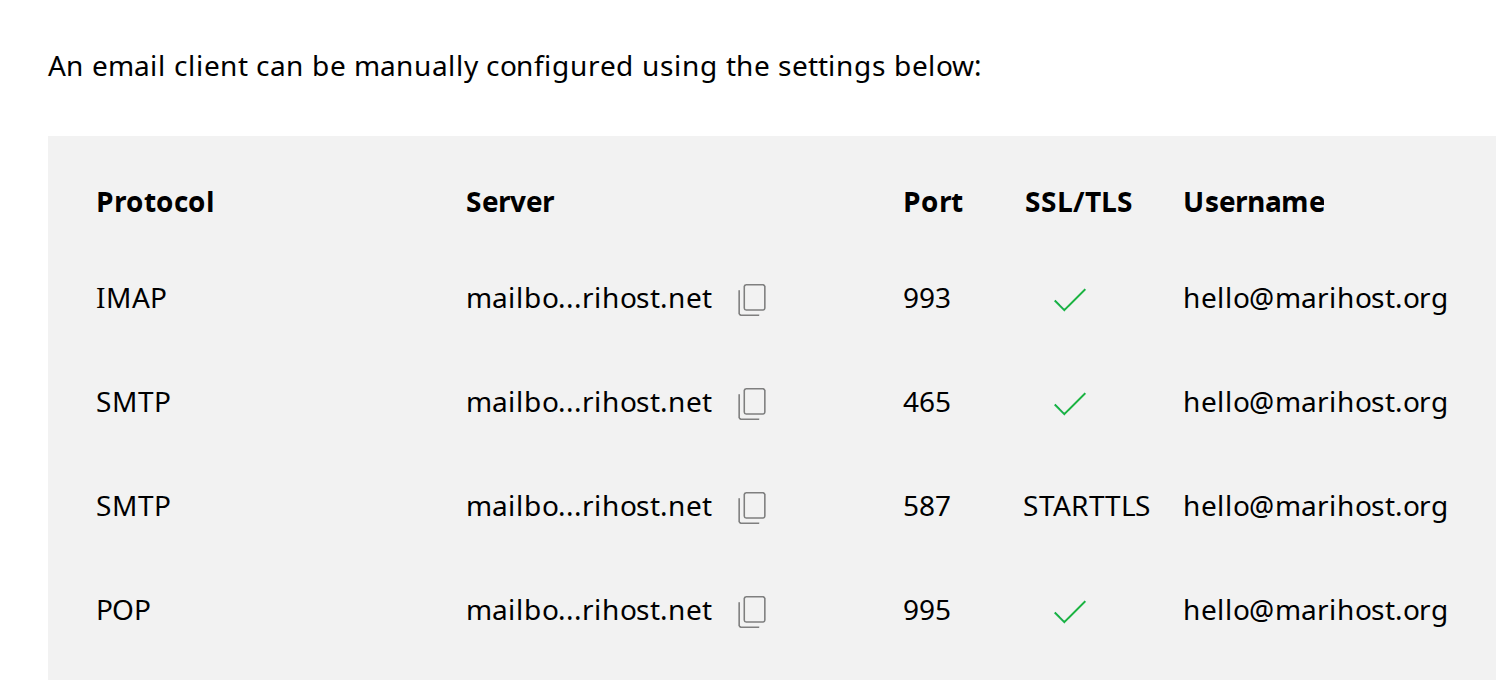
Click Email client settings. You need the SMTP line: the server mailbox.marihost.net, port 465, and your full email address as the username.
The password is the one you chose when you made the mailbox. Forgotten it? Set a new one under Password on the same page, with Reset, and update your mail apps too.
Install FluentSMTP
In WordPress, go to Plugins → Add Plugin, search for "FluentSMTP", then click Install Now and Activate. Its settings are under Settings → FluentSMTP.
Connect it to your mailbox
Under Settings → FluentSMTP, choose Other SMTP as the email service, and fill in:
- From Email: your mailbox's address. Leave Force From Email (recommended) and Set the return-path to match the From Email ticked, so every plugin sends from it.
- From Name: your business name.
- SMTP Host: mailbox.marihost.net
- SMTP Port: 465, with Encryption set to SSL. If 465 doesn't connect, use port 587 with TLS.
- Use Auto TLS and Authentication: leave both on.
- SMTP Username: your full email address. SMTP Password: your mailbox's password. Leave Store in Database chosen: FluentSMTP encrypts the password before saving it.
Click Save Connection Settings. Your address now shows under Active Email Connections, marked Default. If you ever change your mailbox's password, change it here too, or your site's emails stop.
Send a test email
Click Send Test Email at the top of FluentSMTP's page. Send To has your WordPress address filled in; change it to any address you can check, then click Send Test Email. "Test email sent" means our mail server accepted it: check that it reached the inbox, not spam.
Then try the real thing: send a message through your contact form, or ask for a password reset from your login page. FluentSMTP keeps a log of every email your site sends, under Email Logs, for 14 days.
Contact forms
Send each form's notification from your own address, and put the visitor's email address in Reply To: when you click Reply, your answer goes to them. In Fluent Forms, you'll find both in the form's email notification settings.
A form that sends "from" the visitor's own address looks forged to mail services, so it lands in spam or is refused. With Force From Email ticked, FluentSMTP puts your address in for you; the Reply To is up to your form.
If something's not right
The test fails to connect or log in. Check the username is your full email address, type the password again, and save. If port 465 with SSL doesn't connect, try 587 with TLS.
The test was sent, but nothing arrives. Look in the spam folder, and check that DKIM is on for your domain. Sending to an address on the same domain? Check that mailbox's spam settings too: see Forwarders and auto-replies.
An email from your site didn't arrive. Open Email Logs in FluentSMTP: it shows whether the email was sent, and the error if it wasn't.
Emails stopped after a busy hour. Your site or mailbox reached its limit: sending starts again within the hour. Regular busy hours mean the email belongs with a mailing service.
Your email is with Google Workspace or Microsoft 365. Send your site's email through them instead: FluentSMTP has a connection for each. And check your domain's mail routing: see Use Google Workspace or Microsoft 365 email.
Still stuck? Open a ticket with your website and the time of a test email, and we'll look for it in our mail logs.
Next steps
Make sure your domain's records are right with SPF, DKIM and DMARC. Want your own email on your phone too? See Set up your email on a phone or in Outlook.
Rather we looked after it?
WordPress Care keeps your site updated, backed up, monitored and working, done for you every month.
Keep reading
Set up your email on a phone or in Outlook
The IMAP and SMTP settings, and how to add your mailbox to your phone, the Gmail app or Outlook.
Read the guideSPF, DKIM and DMARC: keep email out of spam
What each record does, how to switch on DKIM, and the records to add if your DNS is elsewhere.
Read the guideCreate an email account, and use webmail
A mailbox on your own domain in a couple of minutes, and your email in any browser.
Read the guide