GuideYour WordPress SSL certificate: check it and force HTTPS
Last updated: 25 October 2026
An SSL certificate lets browsers open your website over HTTPS, the secure version of its address, without a "Not secure" warning. At MariHost there's nothing to buy or install: every website gets a free certificate, set up as soon as its domain points to us and renewed for you. This guide shows you where to check it, how to switch WordPress to HTTPS, and how to send every visitor to the secure address. It takes about 10 minutes. You'll need your client area login and, for the WordPress step, an administrator login for your site.
How SSL works at MariHost
- It's free and automatic. Each domain on your website gets a certificate from Let's Encrypt, a free certificate authority that browsers trust. It covers your domain with and without www.
- It takes a few minutes. When you add a domain that already points to MariHost, its certificate is usually ready within 5 minutes. Until then the server uses a temporary certificate, and browsers show a warning.
- It renews itself. The control panel renews each certificate about two weeks before it expires. You don't need to note the date or do anything.
What's left for you: check the certificate is active, switch WordPress to HTTPS, and turn on Force HTTPS. In the pictures below, our test website is marihost.org: you'll see your own domain.
Before you start
Your domain needs to point to MariHost first, because the certificate is only issued for a domain that leads to our server.
Sign in to your client area at billing.marihost.com, open your hosting plan and click Login to Control Panel. Open Websites in the left sidebar, choose your website, then Domains in the top menu. A green tick under DNS status means the domain points to us, and the green padlock next to it means it has a certificate.
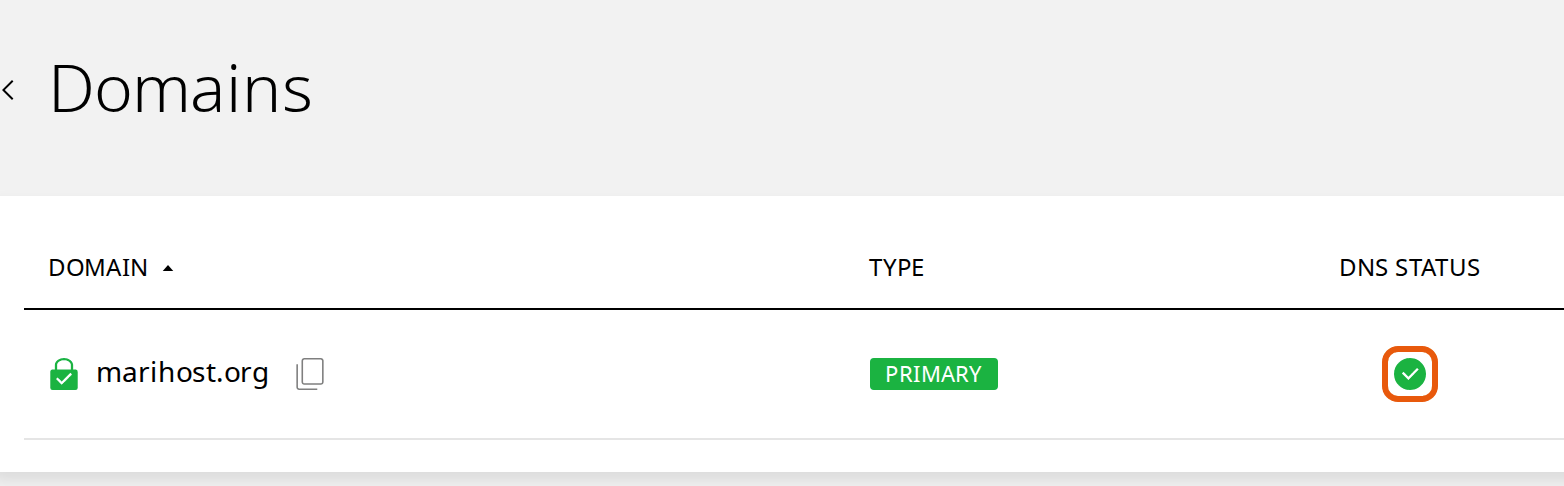
No tick? Point your domain to us first: Point your domain to MariHost shows how. Then come back here.
Check your SSL certificate
1. Open your website's security settings
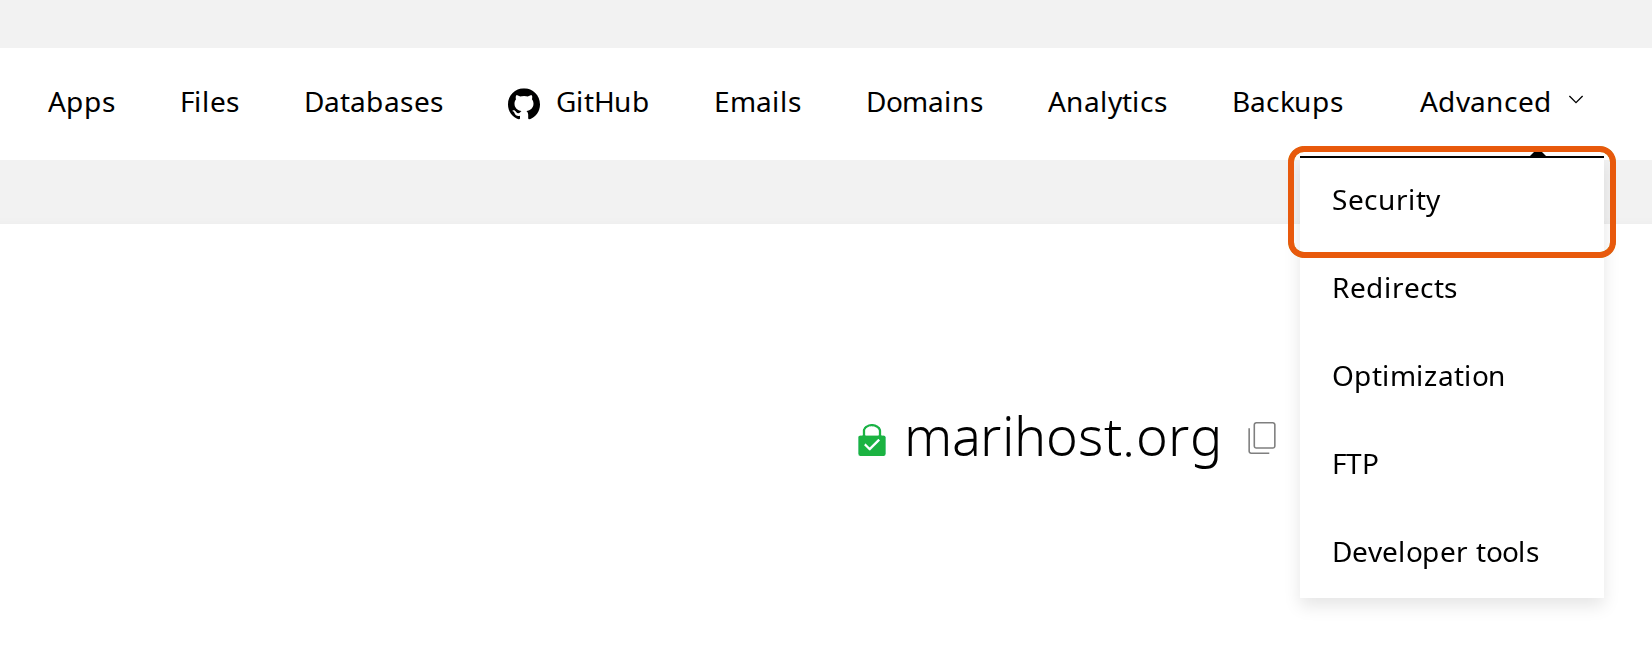
On your website's page in the control panel, open Advanced in the top menu and choose Security.
2. Check the certificate is active
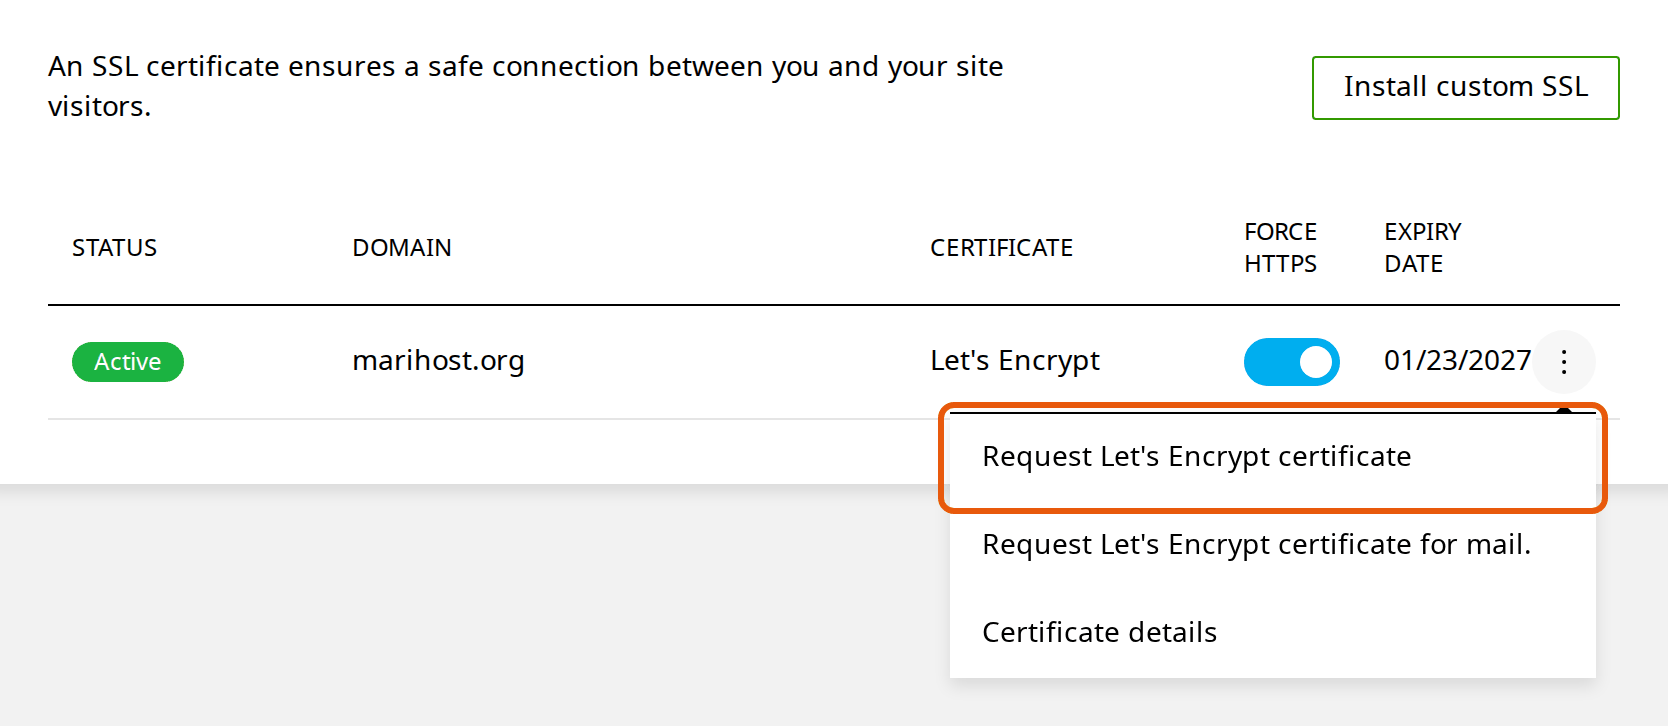
Under SSL certificates, each domain on your website has its own row. Check that it says Active under Status and Let's Encrypt under Certificate. The expiry date is written month first, so 01/23/2027 is 23 January 2027.
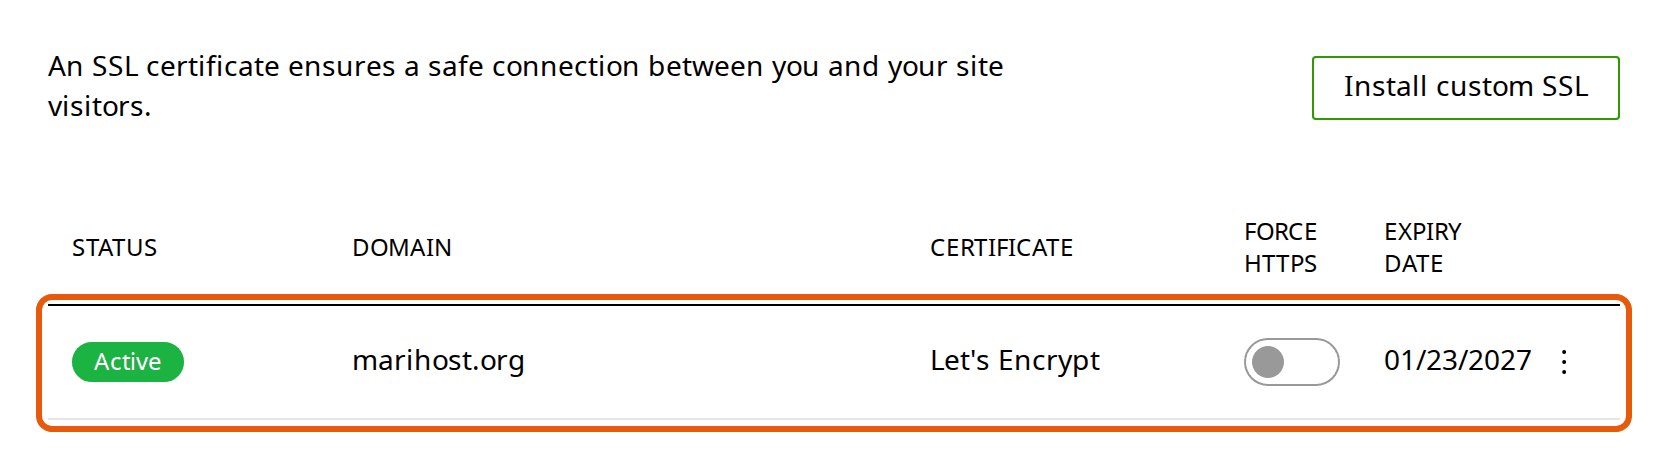
Not Active, or your domain isn't listed? See "If something's not right" below.
Switch WordPress to HTTPS
Not using WordPress? Skip to step 4.
3. Change WordPress's addresses to https://
In WordPress, go to Settings → General. If WordPress Address (URL) and Site Address (URL) both start with https://, WordPress already uses HTTPS: go to step 4.
If they start with http://, there are two ways to change them:
- With Site Health (easiest). Go to Tools → Site Health. If it lists "Your website does not use HTTPS", open it and click Update your site to use HTTPS. WordPress changes both addresses, checks your site works over HTTPS, and changes them back if it doesn't.
- By hand. In Settings → General, change http:// to https:// at the start of both addresses, and click Save Changes.
WordPress may then ask you to log in again: that's normal. If both address fields are greyed out, they're set in your site's wp-config.php file, as WP_HOME and WP_SITEURL. Change http:// to https:// there instead: Edit wp-config.php shows how.
Force HTTPS
4. Turn on Force HTTPS
Back in the control panel, open Advanced → Security again, and click the switch under Force HTTPS in your domain's row. It turns blue. From now on, anyone who types your address with http://, or follows an old http:// link, goes straight to the https:// version of the same page. It's a permanent redirect, so search engines update their links too. If your website has more than one domain, turn it on for each row.
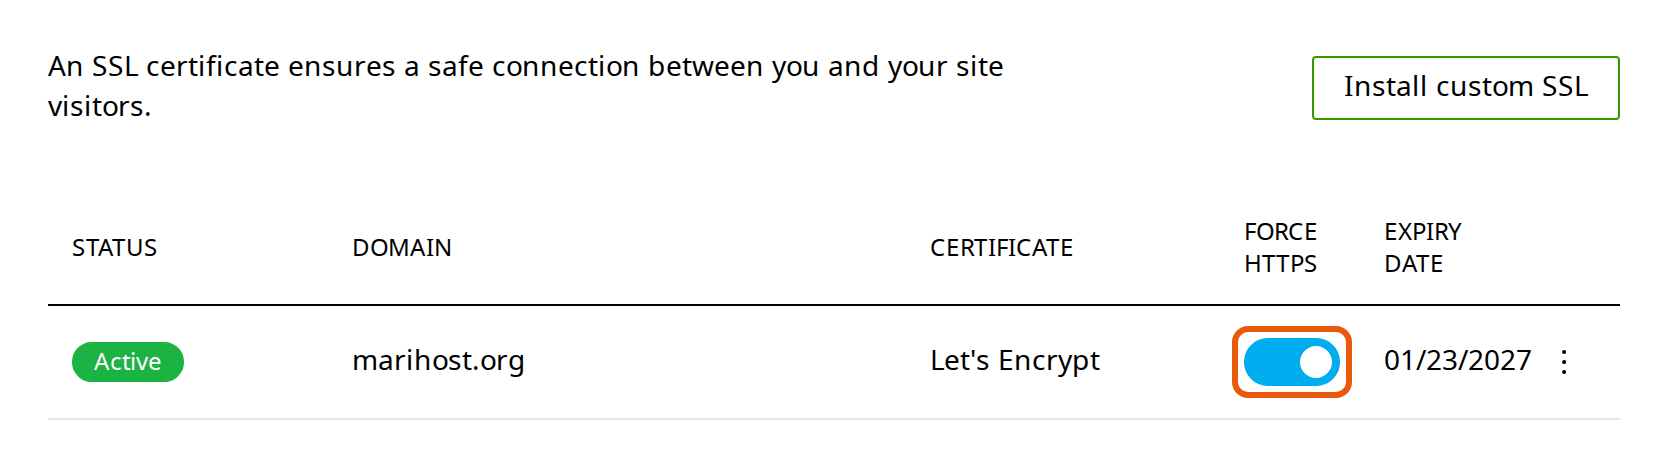
Using Cloudflare? Before you turn this on, check that Cloudflare's SSL/TLS encryption mode is Full (strict). With Flexible, Cloudflare connects to our server over plain HTTP, Force HTTPS sends it back to HTTPS, and visitors get a "too many redirects" error.
Check it's working
- Type your address with http:// in your browser's address bar. It should change to https:// by itself.
- Look at the address bar. Your browser shows the site as secure: a padlock or a site settings icon, with no "Not secure" warning. Check a few pages, not only the home page.
If something's not right
The certificate isn't Active, or your domain isn't listed. Check these first:
- The domain points to us: a green tick under DNS status on the Domains page.
- There are no AAAA records (IPv6 addresses) for the domain or www. Our servers don't use IPv6, and an AAAA record can stop Let's Encrypt checking your domain.
- If you use Cloudflare, set the domain's records to DNS only (grey cloud) while the certificate is issued, then back to Proxied.
Then ask for a new certificate: in Advanced → Security, open the ⋮ menu at the end of the domain's row and choose Request Let's Encrypt certificate. The control panel also tries again by itself, but it waits longer after each failed try, so asking once you've fixed the cause is quicker. Still not Active an hour later? Open a ticket.
Some pages say "Not secure". The page itself is on HTTPS, but it loads an image, script or font from an http:// address. This is called mixed content.
Since WordPress 5.7, WordPress fixes old http:// links to your own site in posts, pages and widgets by itself, but themes, page builders and plugins can keep full addresses in their own settings. To find them, open the page in Chrome, press F12 and look at the Console tab: it lists each "Mixed Content" address. Change it to https:// where it's set.
If there are many, take a backup first (Backups in the control panel), then use a search-and-replace plugin to change http://yourdomain to https://yourdomain. Rather we did it? WordPress Care Plus and Premium include time each month for small jobs like this.
"Too many redirects". This is usually Cloudflare's Flexible mode: set it to Full (strict). While you fix it, you can turn Force HTTPS off again, and your site opens as before.
Using a certificate you bought
Most websites don't need one: browsers show a free certificate and a paid one in the same way. If you've bought one elsewhere, install it in Advanced → Security:
- Click Install custom SSL.
- Choose the domain.
- Paste the certificate (CRT) and its private key, or upload them with Upload file.
- Click Upload.
Your certificate replaces the free one. Renewing it is up to you: if it gets within 3 days of expiring, the control panel requests a free Let's Encrypt certificate for the domain, so your site stays on HTTPS.
Keep the private key to yourself. Certificate details, in the same ⋮ menu, shows your certificate and its private key, so don't paste what's there into an email or a chat.
Next steps
Your site is secure, and every visitor gets the HTTPS address. Just starting out? Read Start a WordPress website. Moving a site from another host? Read Move your site to MariHost.
Stuck?
Tell us your domain name and what you see, and we'll check your certificate for you.
Keep reading
Point your domain to MariHost
Nameservers or DNS records: which to use, and how to change them at your registrar.
Read the guideStart a WordPress website
From choosing a domain to publishing your first page, step by step.
Read the guideMove your site to MariHost
How a move works, what we do for you for free, and how to switch without downtime.
Read the guide