GuideHow to start a website with WordPress, step by step
Last updated: 26 October 2026
This guide takes you from a name on paper to a working website with its first pages. You'll choose a domain, start a hosting plan, install WordPress and set up the basics. Most of it takes an afternoon. The only wait is for your domain to start pointing to your new hosting, which can take a few hours.
You need a name for your business or project, an email address you check, and a debit or credit card to pay once your trial ends. No coding.
What you need to start a WordPress website
A website has three parts:
- A domain, the address people type, such as yourbusiness.my.
- Hosting, the server that stores your website and sends it to visitors.
- WordPress, the free software you use to build and edit your pages. It runs on your hosting.
You rent the domain by the year and the hosting by the month or year. WordPress costs nothing.
Set up your hosting
1. Choose a name and a domain
Pick something short, easy to spell and easy to say over the phone. Search for it on our Domains page to see which endings are available.
If most of your customers are in Malaysia, .my tells them you're local, and .com works everywhere. Many businesses register both and point one to the other. For .my, the registry, MYNIC, can ask for documents. We tell you what's needed after you order.
Already have a domain somewhere else? Keep it. You'll point it to MariHost in step 4.
2. Choose a plan and start your free trial
For one website, the Starter plan is enough. If you expect to run a few sites, or a busy one, our guide to choosing a hosting plan helps you decide.
Every plan starts with a free 3-day trial, so you can set everything up before you pay. After 3 days it carries on as your paid plan, at the price you chose. If you'd rather not keep it, cancel in your client area before the trial ends, and you won't pay anything.
3. Open the control panel
Once your order is confirmed, sign in to your client area at billing.marihost.com. That's where your invoices, domains and hosting live. Open your hosting plan there and click Login to Control Panel: you're signed straight in, with no second password to remember.
The control panel is where you manage websites, files, databases, email and DNS.
4. Point your domain to MariHost
Your domain needs to know where your website lives. If you registered it with us, it already uses our nameservers, so there's nothing to do. If you registered it somewhere else, change its nameservers to ours, ns1.maridns.com and ns2.maridns.com, or add the DNS records we give you. Our guide to pointing your domain to MariHost shows each step.
It usually starts working within a few hours, and can take up to 48. You can carry on with the next steps meanwhile.
Install WordPress
5. Install WordPress in the control panel
- In the control panel, open Websites in the left sidebar.
- If your domain is in the list, click it, choose Apps at the top, then Install app. If it isn't, click Add website, choose Install an app, and enter your domain.
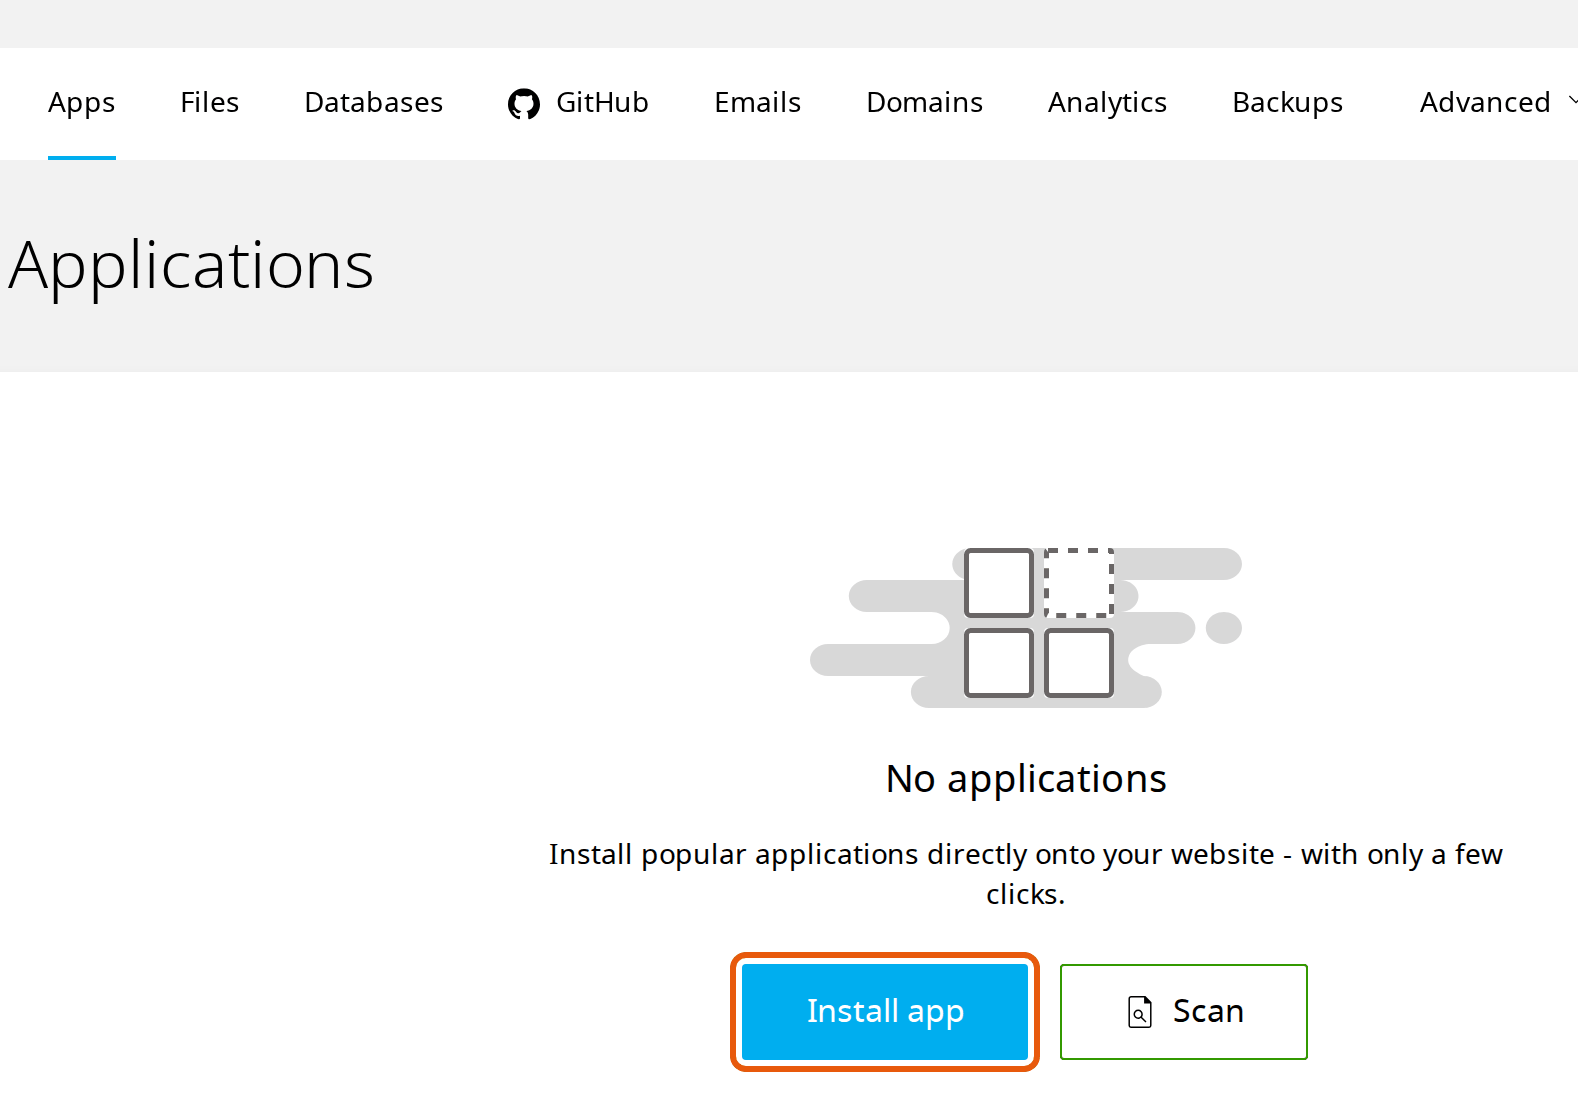
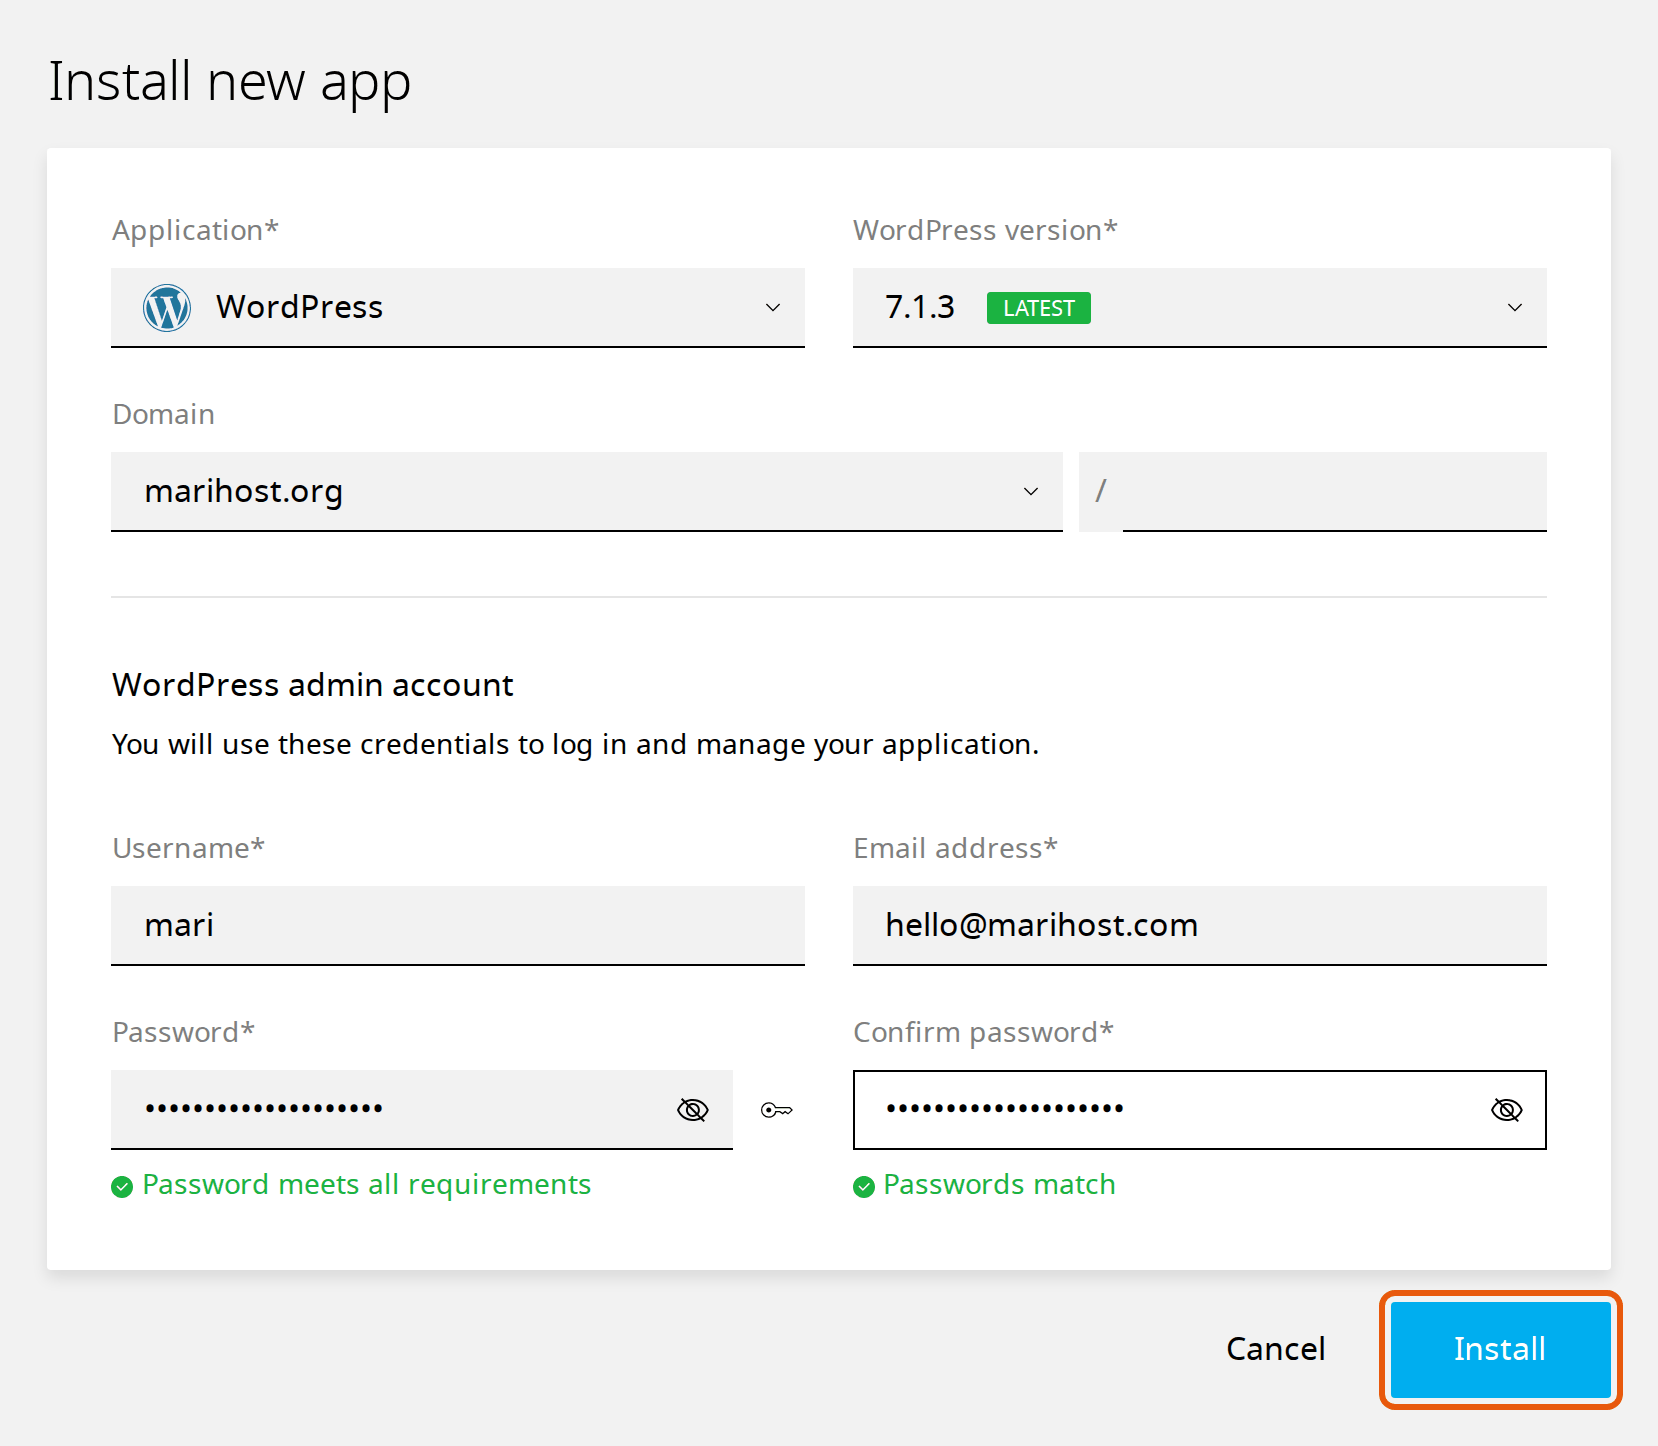
Then fill in the form:
- Check that the application is WordPress and the domain is right. Leave the box after the domain empty, so WordPress is your whole site rather than a folder of it.
- Under WordPress admin account, choose a username, the email address WordPress should write to, and a strong password. This is your WordPress login: keep it somewhere safe, such as a password manager.
- Click Install (Add if you came through Add website). It takes about a minute.
As soon as your domain points to MariHost, HTTPS is set up for it automatically, so visitors see the padlock in their browser. It renews itself too.
6. Log in to WordPress
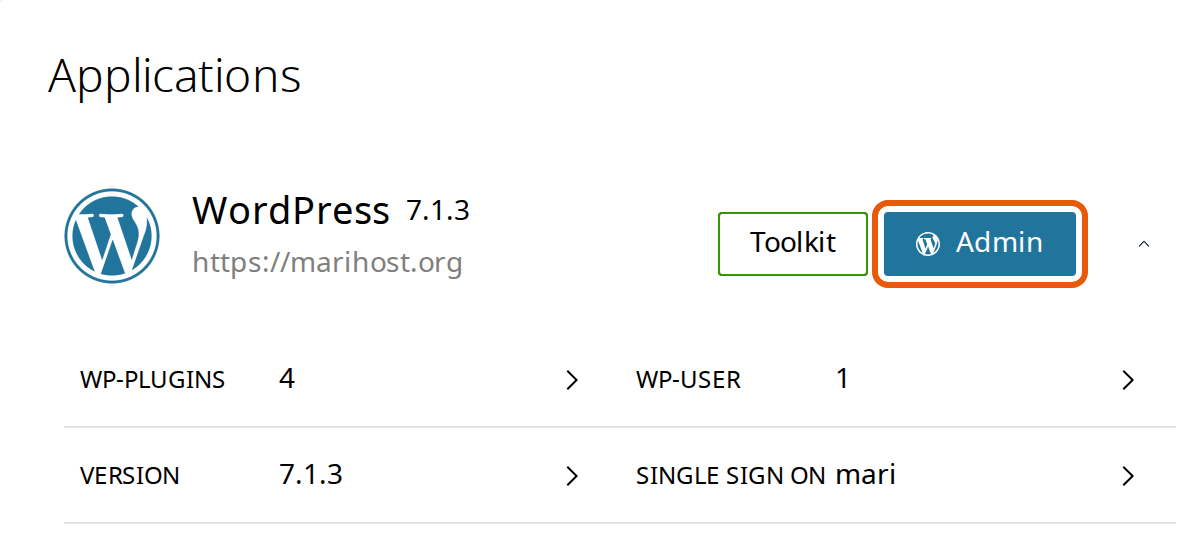
Open the website from Websites and click Admin next to WordPress on its dashboard. It signs you straight in to WordPress, so you don't need to look up a password. Your username and password work too, at your domain followed by /wp-admin.
You'll land on the WordPress dashboard. The menu on the left is where you'll do everything from now on: Pages, Appearance, Plugins and Settings.
Get the basics right
7. Set the title, time zone and links
A few settings are worth getting right before you add anything else:
- Settings → General: fill in the Site Title (your business name) and a short Tagline that says what you do. Under Timezone, choose a city in your time zone, such as Kuala Lumpur, then click Save Changes.
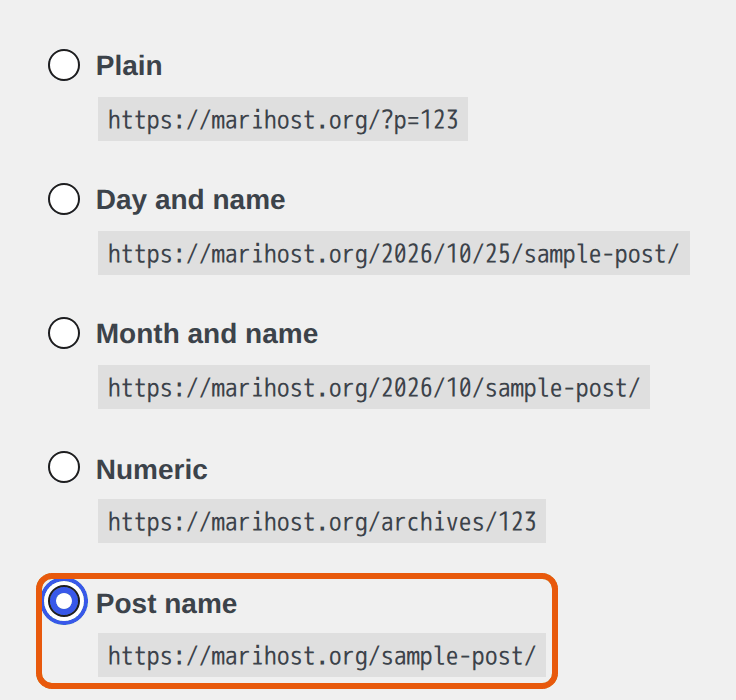
- Settings → Permalinks: a new WordPress site's addresses include the date. Choose Post name and click Save Changes at the bottom of the page. Your pages then get clean addresses, such as yourbusiness.my/about, which people and search engines read more easily. Do this now: changing it later breaks links people have already shared.
8. Choose a theme and a few plugins
The theme sets how your whole site looks. Start with the one WordPress installs, or pick another under Appearance → Themes. Choose one that's popular, recently updated and simple: you can always change the look later.
Plugins add features. Install only what you need, because every plugin is one more thing to update. A good start:
- LiteSpeed Cache is already installed and switched on. It works with our servers to keep ready-made copies of your pages, so they load faster. Leave it on: our guide to LiteSpeed Cache settings shows the two settings worth adding.
- MariCDN by MariHost is installed too: our own CDN plugin. A CDN serves your images, CSS, JavaScript and fonts from servers around the world, so your pages load faster for visitors far from Singapore. Nothing changes until you connect it, on MariCDN's free plan with 3 GB of bandwidth a month: our guide to MariCDN shows the four steps.
- A contact form plugin, for your Contact page.
Add a plugin under Plugins → Add Plugin: search for its name, then click Install Now and Activate.
Add your first pages
Under Pages, add these four. Most business sites start with them:
- Home: who you are, what you offer and how to get in touch, in a few lines. Under Settings → Reading, set it as your homepage.
- About: your story and the people behind the business. Customers like to know who they're buying from.
- Contact: your phone or WhatsApp, email, opening hours and a contact form. Add a map if customers visit you.
- Privacy Policy: what you do with visitors' details, for example from your contact form. Under Settings → Privacy, Create New Page gives you a starting template with suggestions. Edit it to match your business before you publish it.
Write for your customers, not for search engines: say plainly what you do, where, and how to reach you. Then click Publish.
Already looked after: backups and staging
You don't need a backup plugin to get started. Every MariHost plan backs up your websites every day, keeps the backups for 7 days, and lets you restore a site yourself from the control panel. For anything you couldn't do without, keep a copy of your own too.
When you want to try a new theme or a big change, make a staging copy first: in Websites, click Add website, choose Staging website, then Clone a website. Try your changes there, then click Push live when you're happy. Staging copies don't count towards your plan's websites, and search engines don't see them. Our guide to making a staging copy shows each step.
What's next
- Keep WordPress, your theme and your plugins up to date. Log in every week or two and run the updates.
- Moving an existing site rather than starting fresh? See moving your site to MariHost: we do it for free.
- Visitors mostly in Malaysia? Read why our Singapore servers are a few milliseconds away.
- Would you rather not look after updates yourself? WordPress Care does them for you, checks your site afterwards, and fixes anything an update breaks.
Ready to start your website?
Try any plan free for 3 days, or ask us anything on WhatsApp.
Keep reading
Choosing a hosting plan
Websites, storage and bandwidth explained, so you can pick a plan with room to grow.
Read the guideHow to choose web hosting in Malaysia
What to compare before you buy: server location, renewal prices, backups, support and email.
Read the guideSingapore or Malaysia server?
What server location means for speed, with our own measurements from Malaysian cities.
Read the guide